> ## Documentation Index
> Fetch the complete documentation index at: https://www.dynamic.xyz/docs/llms.txt
> Use this file to discover all available pages before exploring further.
# Gemini
Gemini is an exchange account provider. Its OAuth grant authorizes a Gemini account rather than a person, and one account can hold many users, so Gemini can only be linked to a user who is already signed in. It is never a sign-in method.
Gemini requires your own Gemini OAuth credentials. Dynamic-managed credentials are not offered for
this provider.
## Enabling Gemini in the dashboard
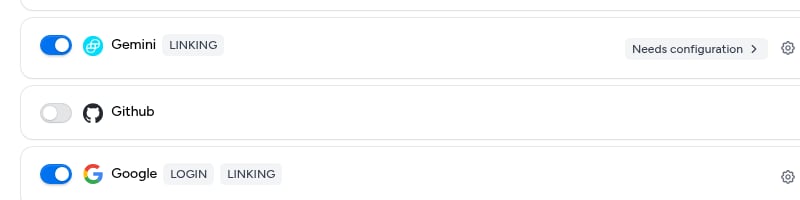
Gemini lives in the Social section of [Login and user profile](https://app.dynamic.xyz/dashboard/log-in-user-profile#social-gemini). Toggle it on and the row shows a single **Linking** badge, where a sign-in provider such as Google shows both **Login** and **Linking**.
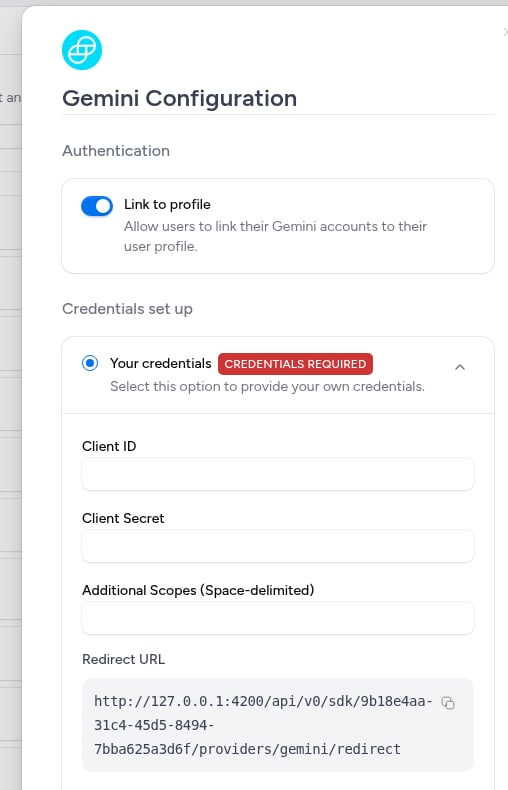
 Open the row's gear icon to configure it. The **Authentication** block offers **Link to profile** only, and **Credentials set up** offers **Your credentials** only. Copy the **Redirect URL** shown here into your Gemini application.
 ## Creating a new app
Here are the step-by-step instructions for obtaining OAuth credentials for Gemini:
1. Sign in to [Gemini](https://exchange.gemini.com/) with the account that will own the application.
2. Go to [API Settings](https://exchange.gemini.com/settings/api) and create an OAuth application.
3. Choose **Confidential** as the client type so Gemini issues both a **Client ID** and a **Client Secret**. This choice is permanent.
4. Request the `account:read` and `balances:read` scopes. Dynamic asks for both when a user links their account: `account:read` identifies the account, `balances:read` reads its balances.
5. Add the Redirect URL from the Dynamic dashboard to the application's approved redirect URIs.
6. Copy the Client ID and Client Secret from Gemini into the Gemini configuration in the Dynamic dashboard, then click **Save changes**.
Gemini's own reference for the flow is its [OAuth 2.0 documentation](https://developer.gemini.com/authentication/oauth).
## What linking gives you
When a user links a Gemini account, Dynamic stores the account snapshot on the linked account: the Gemini account identifier (`accountHashId`), the account's balances, and its notional balances in USD. The signed verification token Gemini returns is not stored; its decoded claims are kept instead.
Access and refresh tokens are stored so you can call Gemini on the user's behalf. To read the token, use the [Get user OAuth access token](https://dynamic.xyz/docs/api-reference/users/getUserOauthAccessToken) API.
## Common pitfalls
* **The user sees only one scope on the consent screen.** Gemini reissues a token with the scopes already granted to your application. Ask the user to revoke your app under their Gemini account settings, then link again.
* **Balance requests return 403.** The `balances:read` scope is required, and the Gemini user linking the account also needs a role that can read balances (Trader, Fund Manager, or Auditor).
## Creating a new app
Here are the step-by-step instructions for obtaining OAuth credentials for Gemini:
1. Sign in to [Gemini](https://exchange.gemini.com/) with the account that will own the application.
2. Go to [API Settings](https://exchange.gemini.com/settings/api) and create an OAuth application.
3. Choose **Confidential** as the client type so Gemini issues both a **Client ID** and a **Client Secret**. This choice is permanent.
4. Request the `account:read` and `balances:read` scopes. Dynamic asks for both when a user links their account: `account:read` identifies the account, `balances:read` reads its balances.
5. Add the Redirect URL from the Dynamic dashboard to the application's approved redirect URIs.
6. Copy the Client ID and Client Secret from Gemini into the Gemini configuration in the Dynamic dashboard, then click **Save changes**.
Gemini's own reference for the flow is its [OAuth 2.0 documentation](https://developer.gemini.com/authentication/oauth).
## What linking gives you
When a user links a Gemini account, Dynamic stores the account snapshot on the linked account: the Gemini account identifier (`accountHashId`), the account's balances, and its notional balances in USD. The signed verification token Gemini returns is not stored; its decoded claims are kept instead.
Access and refresh tokens are stored so you can call Gemini on the user's behalf. To read the token, use the [Get user OAuth access token](https://dynamic.xyz/docs/api-reference/users/getUserOauthAccessToken) API.
## Common pitfalls
* **The user sees only one scope on the consent screen.** Gemini reissues a token with the scopes already granted to your application. Ask the user to revoke your app under their Gemini account settings, then link again.
* **Balance requests return 403.** The `balances:read` scope is required, and the Gemini user linking the account also needs a role that can read balances (Trader, Fund Manager, or Auditor).